
 July 27, 2017 | Posted By heather
-----Updated for 2025----- Many educators and newly-minted "homeschool teachers" have been reaching out for at-home activities to engage young minds in STEAM (Science, Tech, Engineering, Art, and Math). And we want to help. Looking for fun and educational activities to engage your curious kids? These simple science experiments use everyday household items to demonstrate fascinating scientific principles while creating memorable learning experiences.
Dancing Raisins
Objective: Demonstrate buoyancy and the effect of carbon dioxide gas. Materials:- Clear carbonated beverage (sparkling water or clear soda work best)
- Raisins (fresh ones work better than older, dried-out raisins)
- Clear glass or jar
- Pour the carbonated beverage into a clear glass, filling it about ¾ full.
- Drop 5-10 raisins into the glass.
- Observe as the raisins initially sink and then rise and fall repeatedly.
- Try comparing different carbonated beverages to see if some create more movement than others.
Homemade Lava Lamp
Objective: Understand density, polarity, and the interaction between oil and water. Materials:- Clear plastic bottle or tall glass
- Water
- Vegetable oil
- Food coloring
- Alka-Seltzer tablets
- Flashlight (optional, for added effect)
- Fill the bottle about one-quarter full with water.
- Add 5-10 drops of food coloring to the water and mix.
- Slowly pour vegetable oil into the bottle, filling it almost to the top (leave about 1 inch of space).
- Wait for the oil and colored water to completely separate into distinct layers.
- Break an Alka-Seltzer tablet into 4-6 pieces.
- Drop one piece into the bottle and observe the bubbling effect resembling a lava lamp.
- Add additional pieces one at a time as the reaction slows down.
- For an enhanced effect, place a flashlight under or behind the bottle in a darkened room.
Oobleck
Objective: Investigate non-Newtonian fluids that act as both solids and liquids under different conditions. Materials:- 2 cups cornstarch
- 1 cup water (approximate - you may need slightly more or less)
- Large mixing bowl
- Food coloring (optional)
- Plastic tablecloth or tray (this can get messy!)
- Cover your work surface with a plastic tablecloth or tray.
- In a bowl, start by mixing 2 cups of cornstarch with ¾ cup of water.
- Add food coloring if desired and mix until the consistency is uniform.
- Gradually add more water, a tablespoon at a time, until the mixture has a thick, honey-like consistency. The perfect oobleck should flow slowly when the bowl is tilted but feel solid when pressed or squeezed.
-
Experiment by:
- Pressing the mixture quickly with your finger or fist
- Letting it drip slowly through your fingers
- Trying to roll it into a ball, then watching it melt
- Tapping the surface rapidly with a spoon
Dry Erase Floating Pictures
Objective: Explore the properties of dry-erase markers and their insolubility in water to create floating images. Materials:- Dry-erase markers (different colors)
- Glass or ceramic plate (white works best)
- Room temperature water
- Small bowl
- Ensure the plate is clean and completely dry.
- Use the dry-erase markers to draw a simple image on the plate (e.g., stick figure, shapes, short words).
- Allow the ink to dry completely (about 10-15 seconds).
- Slowly pour room temperature water onto the plate, tilting slightly to let the water flow across the drawing.
- Watch as the drawing lifts and floats intact on the water's surface.
- Carefully place your hand in the water and try to lift the floating drawing onto your hand or a piece of paper.
Crystal Growing Garden
Objective: Observe the process of crystallization and learn about supersaturated solutions. Materials:- 6 tablespoons table salt
- 6 tablespoons water
- 1 tablespoon ammonia (helps crystals form more quickly)
- Food coloring (various colors)
- Small shallow dish or bowl
- Porous materials (pieces of sponge, charcoal, brick, coal, or porous rocks)
- Mix the salt, water, and ammonia in a container until most of the salt dissolves.
- Divide the solution into smaller containers and add different food coloring to each.
- Arrange your porous materials in the shallow dish.
- Pour the colored solutions over different areas of your materials.
- Place the dish in a warm, sunny location where it won't be disturbed.
- Observe over several days as colorful crystals begin to form and grow.
Magic Inflating Balloon
Objective: Demonstrate a chemical reaction that produces carbon dioxide gas. Materials:- Empty plastic bottle
- 2 tablespoons baking soda
- 1/4 cup vinegar
- Balloon
- Funnel
- Optional: food coloring
- Using a funnel, put the baking soda into the empty balloon.
- Pour the vinegar into the plastic bottle (add food coloring if desired).
- Carefully stretch the opening of the balloon over the mouth of the bottle, keeping the balloon drooping to the side so the baking soda stays in the balloon.
- When ready, lift the balloon so the baking soda falls into the vinegar.
- Watch as the balloon inflates by itself!
Tips for a Successful Science Experience:
- Prep ahead: Gather all materials before starting to keep kids engaged throughout the experiment.
- Ask questions: Encourage critical thinking by asking open-ended questions like "What do you think will happen if...?" or "Why do you think that happened?"
- Document the process: Take photos or have kids draw pictures/write notes about their observations.
- Connect to Ozobot: After completing these experiments, challenge kids to program their Ozobots to simulate or complement what they've learned. For example, after the Rainbow Milk experiment, program Ozobot to follow swirling color patterns.
Just For Educators
For Everyone
- Find FREE remote learning games (Coding and Math skills!) >
- Check out this awesome science lesson Megan and Caitlin completed with Evo while learning at home 🤯:
1. Jumbo Bubbles
What you’ll need:- Water
- Dish soap
- Corn syrup
- Wire (think wire hanger or floral wire)
- Measuring cup
- Large bowl (or in my case, I used a large Tupperware)
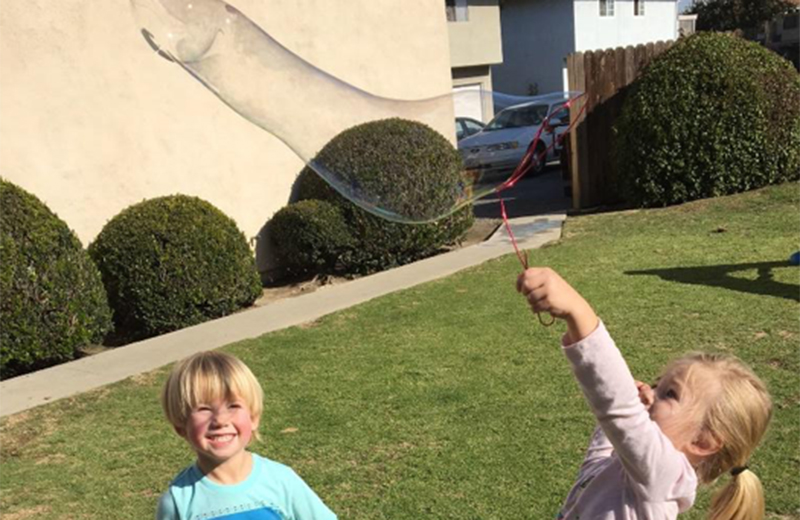 The bubbles were super easy to “blow.” All the kids had to do was lift the wand out of the solution and the wind did the rest. This also kept them entertained for a while!
The science behind it:
A bubble is, essentially, just air wrapped up in soap film. This soap film is made up of a thin layer of water sandwiched between two layers of soap molecules. When this film contacts air, it then forms a bubble.
The bubbles were super easy to “blow.” All the kids had to do was lift the wand out of the solution and the wind did the rest. This also kept them entertained for a while!
The science behind it:
A bubble is, essentially, just air wrapped up in soap film. This soap film is made up of a thin layer of water sandwiched between two layers of soap molecules. When this film contacts air, it then forms a bubble.
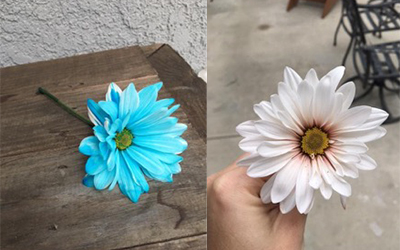
2. Color-Changing Flowers
What you’ll need:- White flowers
- Vase, or other receptacle to hold the flowers
- Water
- Food coloring
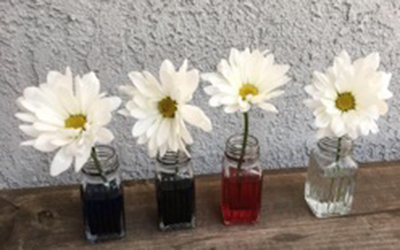 We expected this process to take a few days or so, so when we went outside to play and looked at our flowers, we were surprised to see the blue color had already started to show!
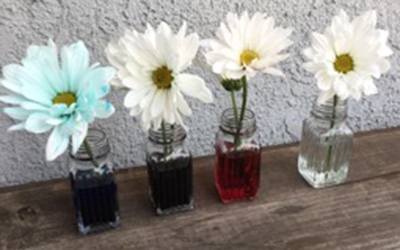 After 24 hours, this was what our flowers looked like:
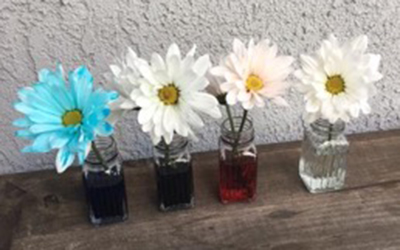 And after 48 hours:
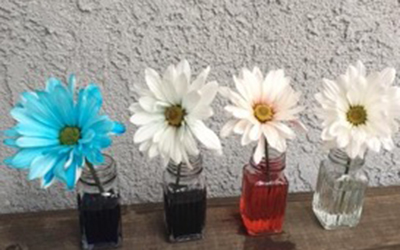 My daughter loved checking up on her flowers throughout the day. Every time, she would mention how the blue was so bright and would ask why the others weren’t absorbing as fast. The perfect science question! Why was the blue dye so quick to transfer to the flower, whereas the pink was slower and the purple hardly showed at all?
 The science behind it:
Most plants "drink" water from the ground through their roots. The water travels up the stem of the plant into the leaves and flowers. The plant uses the water to make food.
When a flower is cut, it no longer has its roots. But the stem of the flower still "drinks" up the water and provides it to the leaves and flowers. So, when you add food coloring to the water, the petals absorb that color.
The science behind it:
Most plants "drink" water from the ground through their roots. The water travels up the stem of the plant into the leaves and flowers. The plant uses the water to make food.
When a flower is cut, it no longer has its roots. But the stem of the flower still "drinks" up the water and provides it to the leaves and flowers. So, when you add food coloring to the water, the petals absorb that color.
3. Homemade Rock Candy
What you’ll need:- Sugar
- Water
- Skewers/candy sticks
- Glass jar(s)
- Large saucepan
- Clothespins
- OPTIONAL: Kool-Aid Packet(s) OR food coloring
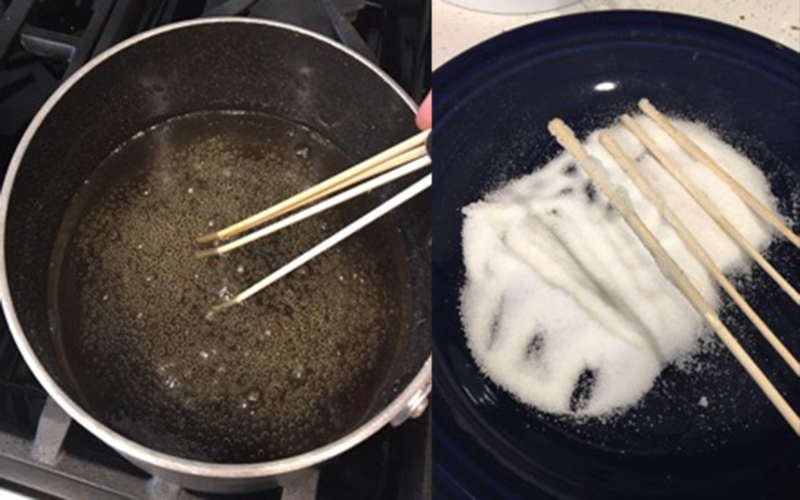 While you wait for the sticks and sugar water to finish cooling, add your packet(s) of Kool-Aid OR a few drops of food coloring into the bottom of your jar(s).
Once the water is cooled, pour into your jar(s). Give it a quick stir to distribute the Kool-Aid powder.
Dip your sticks into the jars and keep them held up by using a clothespin on the top.
Set your jar(s) aside and be patient…
While you wait for the sticks and sugar water to finish cooling, add your packet(s) of Kool-Aid OR a few drops of food coloring into the bottom of your jar(s).
Once the water is cooled, pour into your jar(s). Give it a quick stir to distribute the Kool-Aid powder.
Dip your sticks into the jars and keep them held up by using a clothespin on the top.
Set your jar(s) aside and be patient…
 Okay, let’s talk about my total rock candy FAIL. Somehow, I didn’t get the solution right the first time I tried this experiment. Also, the Kool-Aid packets made it hard for us to see the crystals form (or NOT form, in our case). After two days, I decided to pull the sticks out to take a look and this is what I saw:
What on earth is THAT? Definitely not crystals. Just a thick sludge of sugary mess. I am unsure if I didn’t have the right sugar-to-water ratio or if it was the Kool-Aid packets that I used, but either way it was a fail. I went back to the instructions and just used food coloring this time.
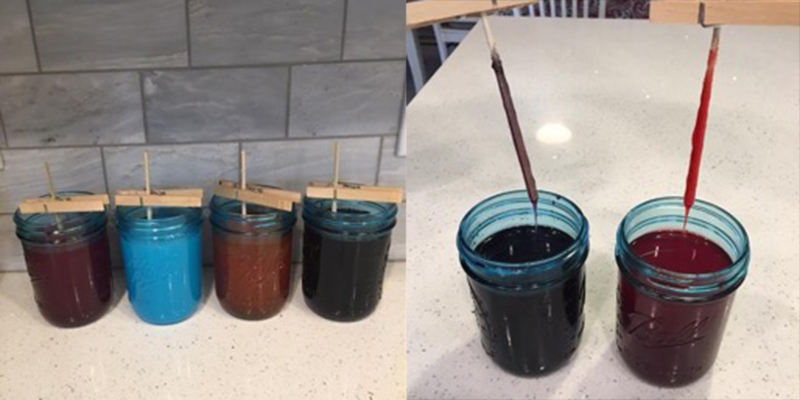
We liked using the food coloring better because we could see things more clearly than the Kool-Aid. It also seemed like I got the sugar mixture right this time, thank goodness! So, we waited to see our final results.
The crystals started to form pretty quickly, this is what ours looked like on day 3:
Okay, let’s talk about my total rock candy FAIL. Somehow, I didn’t get the solution right the first time I tried this experiment. Also, the Kool-Aid packets made it hard for us to see the crystals form (or NOT form, in our case). After two days, I decided to pull the sticks out to take a look and this is what I saw:
What on earth is THAT? Definitely not crystals. Just a thick sludge of sugary mess. I am unsure if I didn’t have the right sugar-to-water ratio or if it was the Kool-Aid packets that I used, but either way it was a fail. I went back to the instructions and just used food coloring this time.
We liked using the food coloring better because we could see things more clearly than the Kool-Aid. It also seemed like I got the sugar mixture right this time, thank goodness! So, we waited to see our final results.
The crystals started to form pretty quickly, this is what ours looked like on day 3:
 We were happy with our results from the second mixture! The crystals would have been larger if we had a wider glass. So, I recommend mason jars over champagne flutes for bigger, more impressive rock candy. Also, because the champagne flutes were small, the crystals got stuck to the glass. This made taking them out very difficult and partly the reason our candy is so sparse on the stick (you can really see this on the red stick).
Although they did not look very impressive, crystals still formed and they still tasted like rock candy!
Now comes the fun part, eating them! Not all at once of course... which my daughter wasn’t too happy about.
The science behind it: There are two different methods that contribute to the crystal growth. You created a supersaturated solution by first heating a saturated sugar solution then allowing it to cool. The supersaturated solution cannot stay in liquid form because it has too much solute (sugar) so the sugar will come out. This is called precipitation.
The other method is evaporation. As the water evaporates, the solution becomes more saturated and sugar molecules will continue to come out of the solution and collect on the seed crystals on the stick. The rock candy crystals grow molecule by molecule.
We were happy with our results from the second mixture! The crystals would have been larger if we had a wider glass. So, I recommend mason jars over champagne flutes for bigger, more impressive rock candy. Also, because the champagne flutes were small, the crystals got stuck to the glass. This made taking them out very difficult and partly the reason our candy is so sparse on the stick (you can really see this on the red stick).
Although they did not look very impressive, crystals still formed and they still tasted like rock candy!
Now comes the fun part, eating them! Not all at once of course... which my daughter wasn’t too happy about.
The science behind it: There are two different methods that contribute to the crystal growth. You created a supersaturated solution by first heating a saturated sugar solution then allowing it to cool. The supersaturated solution cannot stay in liquid form because it has too much solute (sugar) so the sugar will come out. This is called precipitation.
The other method is evaporation. As the water evaporates, the solution becomes more saturated and sugar molecules will continue to come out of the solution and collect on the seed crystals on the stick. The rock candy crystals grow molecule by molecule.
4. Color-Changing Milk
What you’ll need:- Milk
- Dish Soap
- Shallow bowl
- Q-Tips
- Food coloring
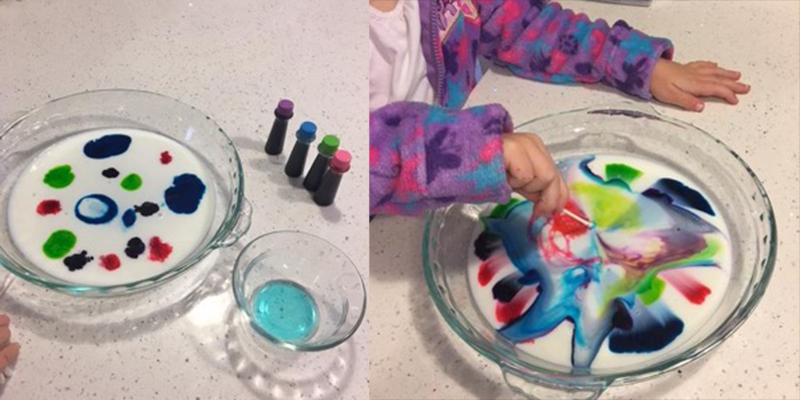 The science behind it: Per Steve Spangler Science, milk is mostly water but also contains vitamins, minerals, proteins, and tiny droplets of fat suspended in solution. Fats and proteins are sensitive to changes in the surrounding solution (the milk).
The secret of the bursting colors is in the chemistry of that tiny drop of soap. Like other oils, milk fat is a non-polar molecule and that means it doesn’t dissolve in water. When soap is mixed in, however, the non-polar (hydrophobic) portion of micelles (molecular soap structures in solution) break up and collect the non-polar fat molecules. Then the polar surface of the micelle (hydrophilic) connects to a polar water molecule with the fat held inside the soap micelle. Thanks to the soap connection, literally, the non-polar fat can then be carried by the polar water.
The science behind it: Per Steve Spangler Science, milk is mostly water but also contains vitamins, minerals, proteins, and tiny droplets of fat suspended in solution. Fats and proteins are sensitive to changes in the surrounding solution (the milk).
The secret of the bursting colors is in the chemistry of that tiny drop of soap. Like other oils, milk fat is a non-polar molecule and that means it doesn’t dissolve in water. When soap is mixed in, however, the non-polar (hydrophobic) portion of micelles (molecular soap structures in solution) break up and collect the non-polar fat molecules. Then the polar surface of the micelle (hydrophilic) connects to a polar water molecule with the fat held inside the soap micelle. Thanks to the soap connection, literally, the non-polar fat can then be carried by the polar water.
5. Skittles Rainbow
What you’ll need:- Bag of Skittles candies
- 5 small glasses
- Hot water
- Tablespoon
- Syringe or pipette
- 10 red
- 8 yellow
- 6 orange
- 4 green
- 2 purple
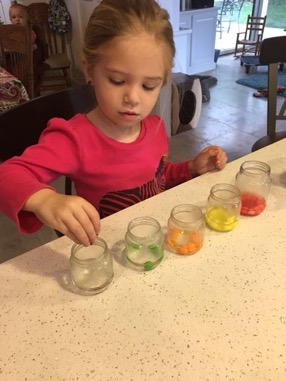 Once the candy dissolves (which should happen quickly), let the water cool to room temperature. If your candy doesn’t dissolve after stirring, try putting the jar in the microwave for 30 seconds.
While the water is cooling, this is the perfect opportunity to ask your child about their hypothesis. I asked my daughter which jar had the most candies in it (therefore, the most sugar. She is only 3, so I need to put the science talk into toddler words). She said orange had the most candy (again, she is 3.. but she’s learning!)
Once the water is at room temperature, pour each colored jar into a separate jar using a pipette or syringe. Start with the color that is the most dense (has the most candies in it) and end with the least dense.
Once the candy dissolves (which should happen quickly), let the water cool to room temperature. If your candy doesn’t dissolve after stirring, try putting the jar in the microwave for 30 seconds.
While the water is cooling, this is the perfect opportunity to ask your child about their hypothesis. I asked my daughter which jar had the most candies in it (therefore, the most sugar. She is only 3, so I need to put the science talk into toddler words). She said orange had the most candy (again, she is 3.. but she’s learning!)
Once the water is at room temperature, pour each colored jar into a separate jar using a pipette or syringe. Start with the color that is the most dense (has the most candies in it) and end with the least dense.
 It is important to use the syringe or pipette and slowly dribble the water down the side of the jar. If you just pour the water in, you’ll end up with a jar of brown water. Also, make sure not to do it TOO slow, it’ll start to lose its brightness if you take too long.
My daughter has a short attention span, so she wasn’t thrilled that we couldn’t just pour the water in. I ended up doing the rest myself, but she loved the rainbow that we made at the end!
It is important to use the syringe or pipette and slowly dribble the water down the side of the jar. If you just pour the water in, you’ll end up with a jar of brown water. Also, make sure not to do it TOO slow, it’ll start to lose its brightness if you take too long.
My daughter has a short attention span, so she wasn’t thrilled that we couldn’t just pour the water in. I ended up doing the rest myself, but she loved the rainbow that we made at the end!
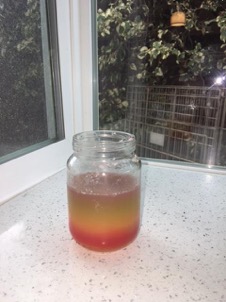 The science behind it: Each glass had the same amount of water, but different amounts of sugar. Because of this, the solution has a layering effect going from least dense (purple) to most dense (red).
6. Color-Changing Squirty Chalk
What you’ll need:- 6 squirt bottles
- Food coloring
- Baking soda
- Vinegar
- Corn starch
- Funnel (if needed)
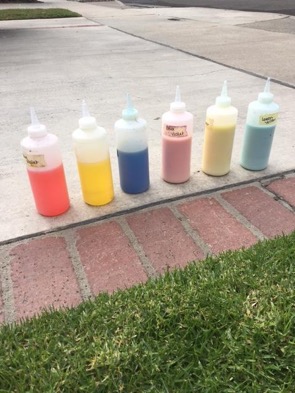 Go outside and have fun!
This one was super fun! We squirted the chalk onto the sidewalk and then squirted the vinegar ones on top and it fizzed and changed color! My daughter had a blast watching it happen. She actually preferred to be the vinegar squirter. I think she liked being the one in charge of the reaction.
We even made a heart!
Go outside and have fun!
This one was super fun! We squirted the chalk onto the sidewalk and then squirted the vinegar ones on top and it fizzed and changed color! My daughter had a blast watching it happen. She actually preferred to be the vinegar squirter. I think she liked being the one in charge of the reaction.
We even made a heart!
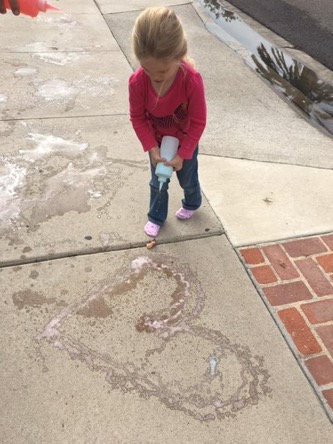 The science behind it: Baking soda and vinegar react with each other because of an acid-base reaction. Baking soda is a bicarbonate and vinegar is an acetic acid. Therefore, the reaction this creates is carbon-dioxide. So, when we add the colored vinegar to the colored chalk, the mixture makes that cool fizzing reaction. The colors change due to adding two colors together to make another color.
7. “Fishing” for Ice
What you’ll need:- Water
- Salt
- Drinking glass
- Food coloring (optional)
- Piece of string
- Ice cubes
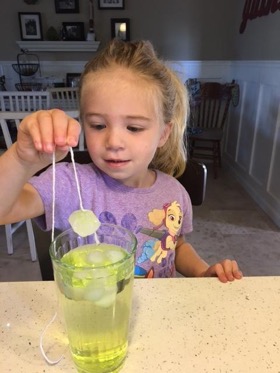 The science behind it: When salt is sprinkled over ice it melts. However, when it is used in such a small amount, like in this experiment, the water around the ice freezes again quickly. This means that the string gets trapped as the water around it refreezes, thus making it stick to the ice.
8. Glitter Explosion
What you’ll need:- Vase
- Baking soda
- Vinegar
- Food coloring
- Glitter
- Pan to contain the mess
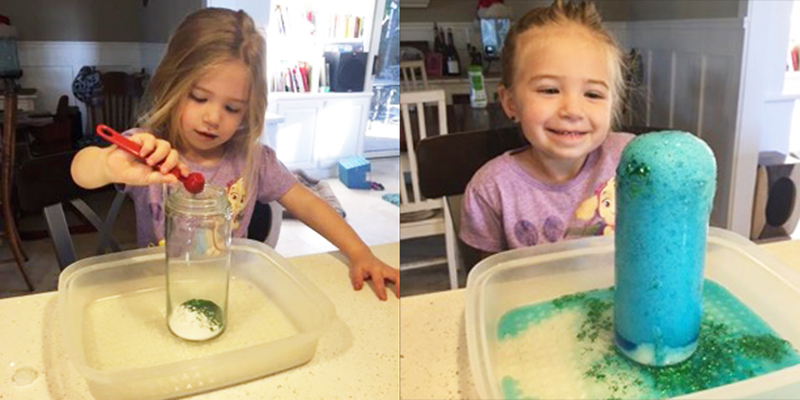 All that talk in the beginning of this post about the volcano experiments in grade school made me want to do something similar with my daughter! Of course, I had to add a baking soda/vinegar reaction type of science experiment to our list because they’re the most fun! Who doesn’t love watching things explode? Especially kids!
She kept wanting to add vinegar to make it explode again and the glitter made it pretty!
There you have it! All of these science experiments for kids were personally tested and given the seal of approval by me. I am no scientist BUT I am a mom who wants to get my kids interested in STEM early on and I feel like these are a great gateway to doing so. Try them out with your kids and send us your photos and experiences!
For even more engaging educational activities your kids can do at home, Ozobot Evo has activities for Science, Technology, Engineering, and Math, all with one little bot!
All that talk in the beginning of this post about the volcano experiments in grade school made me want to do something similar with my daughter! Of course, I had to add a baking soda/vinegar reaction type of science experiment to our list because they’re the most fun! Who doesn’t love watching things explode? Especially kids!
She kept wanting to add vinegar to make it explode again and the glitter made it pretty!
There you have it! All of these science experiments for kids were personally tested and given the seal of approval by me. I am no scientist BUT I am a mom who wants to get my kids interested in STEM early on and I feel like these are a great gateway to doing so. Try them out with your kids and send us your photos and experiences!
For even more engaging educational activities your kids can do at home, Ozobot Evo has activities for Science, Technology, Engineering, and Math, all with one little bot!
Comments (0)